I've been on a big organization kick lately, trying to de-clutter and
de-own. While organizing our storage/gear room I was forced to confront a section of Ikea hardwood counter top I've had laying around for the past couple years waiting to be built into a workbench. Then earlier this week as I was wiring up a Bluetooth speaker amplifier (post to come later), sitting on a bar stool leaning over a low table while trying not to inhale solder smoke, I decided it was time to finally build that bench. I wanted something simple, cheap, and collapsible, so it could be tucked away if we needed some floorspace in our smallish Sierra cabin. I don't have a power saw and I didn't want to create a bunch of waste, so I sketched up a no-waste folding table base made from raw dimensional lumber.
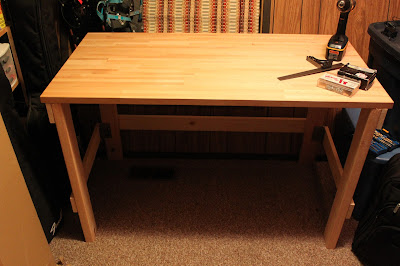 |
| Finished Folding Desk |
The counter section I have is roughly 2x4 feet (though not exactly, because Ikea stuff is in metric), and I like a tall desk, so I figured 30 inches was about right. I wanted to use 2x4s for the legs to be able to bear a decent load, but 1x4s are sufficient to tie the legs together. The design I had in mind required tying the side sections to the back of the table base with 4 hinges, and I typically prefer the security of screws to nails.
Thus I had my parts list:
- 1 10ft 2x4 cut into quarters = 4 30" table legs
- 1 8ft 1x4 cut in half = 2 4ftcross-ties for back section
- 1 8 ft 1x4 cut into quarters = 4 2ft cross-ties for side sections
- 1 box of screws (I had 1-5/8" deck screws on hand)
- 4 adequately sized hinges
Lowes and Home Depot both will cut lumber for you; they say the first four cuts are free, but in this case they made all seven cuts for no charge.
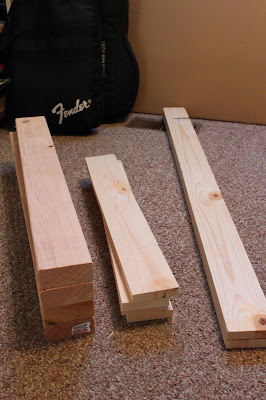 |
| Cut lumber- three boards, seven cuts, one table |
|
The back section consists of two legs and two 4ft cross-ties. Starting with the top and using a square, I used three screws per side to attach the 1x4 level with the top of the legs.
Then I attached the lower tie in the same manner. I chose to put it about 8" off the floor, which puts it at a good height for a foot rest.
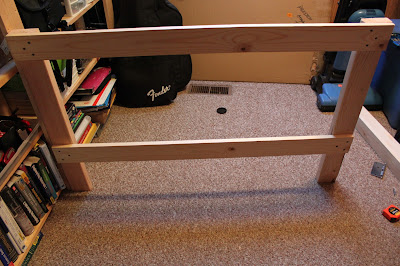 |
| Back section of table base |
Using raw lumber presents some challenges. The boards are straight(ish) and the cuts are straight(ish) so in theory it should be really easy to square things up. In practice, just because two legs are square to the same cross-tie, does not mean they are square to each-other. There are ways to overcome this obviously, but for this quick-and-dirty table they were ignored. I was aiming to get this done with minimal fuss, and my tolerances for levelness and squareness were very loose. That said, the table back came out fairly level.
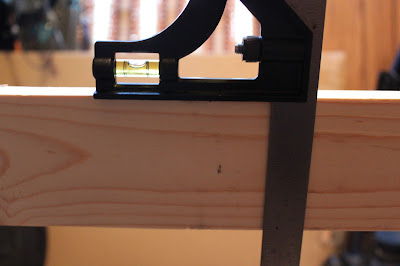 |
| A little tilt, but over a short run of 4ft its no big deal |
|
Another common issue is whether to drill pilot holes. This depends on the brittleness of the wood and the diameter of the screw. I drilled the first couple of pilot holes before deciding that the wood was soft enough that it wasn't necessary. For the most part this was true, except for one particular screw that was placed too close to the edge.
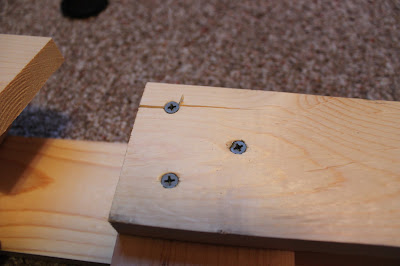 |
| Dangers of working fast and loose |
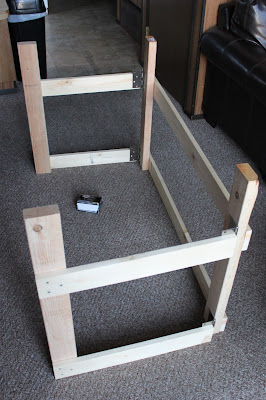
Next, I laid out the side sections in the folded position. The hinges attach the side cross-ties to the rear legs, so I mocked up the hinges to make sure I knew how everything was going to fold together. Then, I screwed the front legs to the side ties.
 |
| Side sections laid out on the back section |
Hinges can start to get surprisingly expensive, so I grabbed some cheap door hinges which were a little wider than the 1x4s. Only two screws were really necessary for strength, so using a square I lined up the hinges where two screw holes would get a good grip in the wood and I attached them to the side cross-ties.
While the bottom of the legs can be trimmed or shimmed, the top of the table base really needs to be flat for the counter to sit on. So, once all four hinges were attached to the side sections, I turned the sections on their top because the floor is relatively flat, and then screwed the hinges to the rear legs.
 |
| Again, I'm using the minimum viable method for squaring things up |
With that, the table base is complete. Things are more square when the side sections are folded out, but they fold in relatively well. There is a little "interference fit" which requires you to push the sides in the last couple inches, this could be sanded away, but that same interference holds the legs shut once they are in.
Finally, I set the counter section on top of the base. Because the top is heavy, and the legs are on carpet, I'm not too concerned about collapse. You could put cleats on the top which attach to the base with pins, but for now I like the fact that I didn't have to make any permanent holes in the hardwood counter. Should the thing all fall over one day I'm sure I will rethink this position.
|
| Ready for new projects (like this post) |
So far, it has definitely been worth the $20 and 1.5 hours (including waiting for the guy at Lowes to cut the wood).


How long did it take to make?
ReplyDeletePer the last sentence, about an hour and a half. Ellis was there providing some distraction though.
ReplyDelete